Sesame (Sesamum indicum) is one of the oldest oilseed crops known to humanity. Its seeds are used extensively in cooking, and sesame oil is a common ingredient in many cuisines around the world.
Growing sesame can be a rewarding experience for gardeners, providing a source of nutritious seeds and beautiful flowers.
This article will guide you through the process of planting and growing sesame, covering essential aspects such as care, pruning, growing from seed, harvesting, growing in pots, common pests, bloom, common issues, and frequently asked questions.
Growing Sesame from Seed
Growing sesame from seed is an engaging process that can be accomplished with careful planning and execution. Here is a step-by-step guide to help you get started:
-
Select Quality Seeds
- Purchase Seeds: Obtain high-quality sesame seeds from a reputable supplier. Ensure the seeds are suited to your local climate conditions.
- Check Viability: Conduct a germination test by placing a few seeds on a damp paper towel. Fold the towel, place it in a plastic bag, and keep it warm. Check for sprouting within 5-7 days.
-
Prepare the Soil
- Choose the Right Location: Select a sunny spot in your garden that receives at least 6-8 hours of direct sunlight daily.
- Soil Requirements: Sesame prefers well-drained, sandy loam soil with a pH between 5.5 and 8.0.
- Amend the Soil: Incorporate organic matter, such as compost or well-rotted manure, to improve soil fertility and drainage. Avoid soils that retain too much water to prevent root rot.
-
Plan the Planting Time
- Optimal Temperature: Plant sesame seeds when the soil temperature is consistently above 70°F (21°C). This is usually after the last frost date in spring.
- Timing: Sesame requires a long growing season, typically 90-120 days from planting to maturity. Ensure your region has a sufficiently long frost-free period.
-
Sow the Seeds
- Spacing: Space the seeds 6-12 inches apart in rows that are 2-3 feet apart. This spacing allows adequate airflow and reduces the risk of fungal diseases.
- Depth: Plant the seeds about 1/2 inch deep in the soil. Planting too deeply can hinder germination.
-
Watering
- Initial Watering: Water the soil thoroughly after planting to ensure good seed-to-soil contact.
- Consistent Moisture: Maintain consistent moisture during the germination period. The soil should be kept moist but not waterlogged.
- Reduce Watering: Once the seedlings are established, water deeply but less frequently. Sesame plants are drought-tolerant and prefer the soil to dry out between waterings.
-
Thinning the Seedlings
- Wait for Growth: Allow the seedlings to grow to about 4-6 inches tall.
- Thin Out: Thin the seedlings to one plant every 6-12 inches. Removing weaker plants ensures that the remaining seedlings have enough space and resources to thrive.
-
Fertilization
- Initial Fertilization: If your soil is poor, apply a balanced fertilizer before planting.
- Side Dressing: As the plants grow, side-dress with a balanced fertilizer or compost midway through the growing season to provide additional nutrients.
-
Pest and Disease Management
- Regular Inspection: Check plants regularly for signs of pests or diseases.
- Natural Remedies: Use organic methods like neem oil, insecticidal soap, or beneficial insects to manage pest populations.
- Disease Prevention: Ensure proper spacing and air circulation to minimize fungal diseases. Avoid overhead watering.
-
Monitoring Growth
- Support Plants: In windy areas, consider staking the plants to prevent them from toppling over.
- Weeding: Keep the area around the plants weed-free to reduce competition for nutrients and water.
-
Preparing for Harvest
- Maturity Indicators: Sesame plants are ready for harvest when the leaves turn yellow and fall off, and the seed pods turn brown and start to split open.
- Harvest Timing: Harvest the plants promptly to avoid seed loss due to shattering pods.
Growing Sesame in Pots

Growing sesame in pots is a great way to cultivate this versatile plant in limited space, whether you have a small garden, balcony, or patio. Here’s a detailed guide on how to grow sesame in pots effectively:
-
Selecting the Right Variety
- Compact Varieties: Choose sesame varieties that are well-suited for container gardening. Look for compact or dwarf varieties that don’t grow excessively tall.
- Seed Purchase: Purchase high-quality seeds from a reputable supplier to ensure good germination and healthy plants.
-
Choosing the Pot
- Size and Depth: Select a pot that is at least 12 inches in diameter and 12-18 inches deep. Sesame plants have a moderate root system that needs adequate space.
- Material: Use pots made of materials like terracotta, plastic, or ceramic. Ensure the pot has drainage holes to prevent waterlogging.
-
Preparing the Potting Mix
- Well-Draining Mix: Use a high-quality, well-draining potting mix. A mix that contains peat, perlite, and compost works well for sesame.
- Soil Amendment: Add some organic matter, such as compost or well-rotted manure, to the potting mix to provide nutrients.
-
Planting the Seeds
- Seed Depth: Plant the sesame seeds about 1/2 inch deep in the potting mix. Sesame seeds are small, so handle them carefully.
- Spacing: If planting multiple seeds in one pot, space them about 6-12 inches apart to ensure each plant has enough room to grow.
-
Watering
- Initial Watering: Water the pot thoroughly after planting to settle the soil and provide moisture for germination.
- Consistent Moisture: Keep the soil consistently moist but not waterlogged during the germination and early growth stages. Water deeply but less frequently once the plants are established.
-
Providing Sunlight
- Full Sun: Place the pot in a location that receives at least 6-8 hours of direct sunlight daily. Sesame plants thrive in full sun.
- Mobility: One advantage of growing in pots is the ability to move the plants to optimize sunlight exposure throughout the day.
-
Fertilization
- Initial Fertilization: Mix a balanced, slow-release fertilizer into the potting mix before planting.
- Ongoing Feeding: Feed the plants with a balanced liquid fertilizer every 4-6 weeks during the growing season to support continuous growth and flowering.
-
Supporting the Plants
- Staking: As sesame plants grow taller, they may need support to prevent toppling. Use stakes or a small trellis to keep the plants upright.
- Wind Protection: In windy areas, position the pots where they are sheltered from strong winds to avoid damage.
-
Pruning and Maintenance
- Pruning: Prune any damaged or diseased leaves to maintain plant health. Regularly check for pests and manage them promptly.
- Weeding: Although pots typically have fewer weed issues, remove any weeds that do appear to reduce competition for nutrients.
-
Monitoring and Adjusting Care
- Regular Inspection: Check the plants regularly for signs of stress, pests, or diseases. Adjust watering and feeding schedules based on plant needs.
- Temperature Management: Ensure the pots are in a location where they can enjoy warm temperatures, ideally between 77°F and 86°F (25°C to 30°C). Protect the plants from frost.
-
Harvesting
- Maturity Indicators: Sesame is ready for harvest when the leaves turn yellow and fall off, and the seed pods turn brown and begin to split open.
- Harvest Technique: Cut the plants at the base and hang them upside down in a dry, well-ventilated area to allow the seeds to dry and fall out naturally.
-
Storing the Seeds
- Seed Cleaning: After drying, clean the seeds by removing debris and store them in airtight containers.
- Cool, Dry Storage: Store the seeds in a cool, dry place to maintain their quality
Caring for Sesame Plants
Caring for sesame plants involves providing optimal conditions to ensure healthy growth and maximum yield. Here are detailed steps to guide you through the care process:
-
Soil Preparation and Maintenance
- Soil Type: Sesame prefers well-drained, sandy loam soil with a pH between 5.5 and 8.0. Ensure the soil is loose and well-aerated.
- Soil Amendment: Before planting, incorporate organic matter such as compost or well-rotted manure into the soil to improve fertility and drainage. This provides essential nutrients and enhances soil structure.
- Mulching: Apply a layer of organic mulch around the base of the plants to conserve moisture, regulate soil temperature, and suppress weeds.
-
Watering
- Initial Watering: After planting the seeds, water the soil thoroughly to establish good seed-to-soil contact.
- Consistent Moisture: Keep the soil consistently moist during the germination and early growth stages. Water the plants deeply but infrequently, allowing the topsoil to dry out between watering sessions.
- Avoid Overwatering: Sesame plants are drought-tolerant once established and prefer drier conditions. Overwatering can lead to root rot and other fungal diseases.
-
Fertilization
- Pre-Planting Fertilization: Mix a balanced fertilizer into the soil before planting. Use fertilizers that provide a good mix of nitrogen, phosphorus, and potassium.
- Side Dressing: Apply a side dressing of balanced fertilizer or compost midway through the growing season to support continued growth and seed development. Avoid excessive nitrogen, as it can promote foliage growth at the expense of seed production.
-
Sunlight
- Full Sun: Sesame plants require full sunlight to thrive. Ensure they receive at least 6-8 hours of direct sunlight daily. Choose a planting location that is not shaded by trees or buildings.
- Maximize Light Exposure: If growing in pots, place the containers in a sunny spot, such as a south-facing balcony or patio.
-
Temperature and Climate
- Optimal Temperature: Sesame grows best in warm temperatures, ideally between 77°F and 86°F (25°C to 30°C). It is sensitive to frost, so ensure that the planting season aligns with warm weather.
- Frost Protection: In cooler climates, start seeds indoors and transplant them outside after the danger of frost has passed. Use row covers or protective cloches to shield young plants from unexpected cold snaps.
-
Weed Control
- Regular Weeding: Keep the area around the sesame plants free from weeds, which compete for nutrients, water, and light. Regular weeding also reduces the habitat for pests and diseases.
- Mulching: As mentioned earlier, mulch helps suppress weeds and retain soil moisture, providing a dual benefit.
-
Pest and Disease Management
- Monitor Regularly: Inspect plants frequently for signs of pests such as aphids, whiteflies, and cutworms. Early detection allows for prompt action.
- Natural Remedies: Use organic pest control methods such as neem oil, insecticidal soap, or introducing beneficial insects like ladybugs to manage pest populations.
- Disease Prevention: Ensure good air circulation by spacing plants adequately and avoiding overhead watering. Remove and destroy any infected plant material to prevent the spread of diseases.
-
Pruning and Thinning
- Thinning Seedlings: Thin seedlings to one plant every 6-12 inches to reduce competition and promote healthy growth.
- Pruning: While sesame plants do not require extensive pruning, removing damaged or diseased leaves helps maintain plant health and reduces the risk of disease.
-
Supporting Plants
- Staking: In areas with strong winds or if the plants become top-heavy, consider staking to provide support and prevent lodging.
- Windbreaks: Planting windbreaks or using protective barriers can shield sesame plants from strong winds that could damage them.
-
Preparing for Harvest
- Maturity Indicators: Sesame is ready to harvest when the leaves turn yellow and begin to drop, and the seed pods (capsules) turn brown and start to split open.
- Harvesting Technique: Cut the plants at the base and hang them upside down in a dry, well-ventilated area to allow the pods to dry completely. Place a tarp underneath to catch falling seeds.
Pruning Sesame Plants
Pruning sesame plants isn't a necessity, but it can help improve air circulation, reduce disease risk, and manage plant growth. Here’s a detailed guide on how to prune sesame plants effectively:
-
Understand the Growth Habit
- Growth Pattern: Sesame plants typically grow upright with a single main stem. They can reach heights of 3-6 feet depending on the variety and growing conditions.
- Branching: Some varieties branch more than others. Pruning can help manage excessive branching, especially in dense plantings.
-
Timing for Pruning
- Early Stages: Begin pruning once the plants are about 4-6 inches tall. This helps to establish a strong, healthy structure early on.
- Throughout the Season: Regularly monitor the plants and prune as needed throughout the growing season. Avoid heavy pruning late in the season as it can stress the plants and affect seed production.
-
Tools and Equipment
- Pruning Shears: Use sharp, clean pruning shears to make precise cuts and avoid damaging the plants.
- Sanitization: Regularly sanitize pruning tools to prevent the spread of diseases. Dip the blades in a solution of one part bleach to nine parts water or use rubbing alcohol.
-
Initial Thinning
- Seedling Thinning: Thin seedlings to ensure adequate spacing, which is crucial for air circulation and healthy growth. Thin to one plant every 6-12 inches.
- Remove Weak Seedlings: Remove the weakest seedlings, leaving the strongest and healthiest ones to grow.
-
Removing Damaged or Diseased Parts
- Inspect Regularly: Frequently check the plants for any signs of damage or disease. Early detection is key to preventing spread.
- Prune Affected Areas: Cut off any leaves, stems, or branches that show signs of disease, discoloration, or damage. Make clean cuts just above a healthy node or branch junction.
-
Managing Excessive Branching
- Selective Pruning: In densely planted areas or varieties that branch excessively, selectively prune some of the lateral branches. This helps improve light penetration and air circulation.
- Balance Growth: Aim for a balanced structure where the main stem remains dominant. Remove any branches that compete with the main stem for resources.
-
Encouraging Strong Main Stems
- Pinching Tips: Pinch back the growing tips of young plants to encourage bushier growth and stronger stems. This is especially useful in early stages to promote a sturdy plant structure.
- Height Control: In taller varieties, selectively pinch or prune the main stem to control height and prevent lodging (falling over).
-
Improving Air Circulation
- Remove Lower Leaves: Prune the lower leaves that may come into contact with the soil. This reduces the risk of soil-borne diseases and improves air flow around the base of the plant.
- Thin Dense Growth: In areas with high humidity or frequent rainfall, thinning out dense foliage helps reduce the risk of fungal infections.
-
Preparing for Harvest
- Late Season Pruning: Towards the end of the growing season, reduce pruning activities to avoid stressing the plants. Focus on maintaining plant health and preparing for harvest.
- Ease of Harvest: Lightly prune any excessively tall or unruly plants to make harvesting easier. This ensures better access to the seed pods.
-
Disposal of Pruned Material
- Remove Debris: Collect and dispose of all pruned material properly. Do not leave it in the garden as it can attract pests and harbor diseases.
- Composting: Compost healthy plant material if desired, but ensure diseased or pest-infested material is discarded to prevent contamination.
Common Pests and Control for Sesame Plants
Sesame plants, like many crops, can be susceptible to various pests. Effective pest management is crucial for maintaining healthy plants and ensuring a good harvest. Here are common pests that affect sesame plants and methods to control them:
-
Aphids
- Identification: Small, soft-bodied insects that can be green, black, brown, or red. They cluster on the undersides of leaves and stems.
- Damage: Aphids suck plant sap, causing leaves to curl, yellow, and deform. They can also transmit viral diseases.
- Control:
- Natural Predators: Introduce ladybugs or lacewings, which feed on aphids.
- Neem Oil: Spray neem oil solution on affected plants to repel and kill aphids.
- Insecticidal Soap: Apply insecticidal soap to the infested areas to reduce aphid populations.
-
Whiteflies
- Identification: Tiny white insects that fly up when plants are disturbed. They often cluster on the undersides of leaves.
- Damage: Whiteflies suck plant juices, causing leaves to yellow, wilt, and drop prematurely. They also excrete honeydew, leading to sooty mold growth.
- Control:
- Yellow Sticky Traps: Place yellow sticky traps around the plants to capture adult whiteflies.
- Neem Oil: Use neem oil sprays to disrupt the life cycle of whiteflies.
- Reflective Mulch: Apply reflective mulch to repel whiteflies from the plants.
-
Cutworms
- Identification: Larvae of moths that are often gray or brown. They hide in the soil during the day and feed at night.
- Damage: Cutworms cut off seedlings at the base, causing them to fall over.
- Control:
- Physical Barriers: Place collars made of cardboard or plastic around seedlings to prevent cutworms from reaching them.
- Diatomaceous Earth: Sprinkle diatomaceous earth around the base of plants to deter cutworms.
- Handpicking: Manually remove cutworms from the soil surface during the evening.
-
Spider Mites
- Identification: Tiny, spider-like pests that are often red or brown. They create fine webbing on the undersides of leaves.
- Damage: Spider mites suck plant sap, leading to stippled, yellowed, and bronze leaves. Severe infestations can cause defoliation.
- Control:
- Water Spray: Use a strong jet of water to dislodge spider mites from the plants.
- Miticides: Apply specific miticides that target spider mites.
- Horticultural Oil: Use horticultural oil to smother and kill spider mites.
-
Leafhoppers
- Identification: Small, wedge-shaped insects that are usually green or brown. They are highly mobile and jump when disturbed.
- Damage: Leafhoppers suck sap from leaves, causing them to curl, turn yellow, and develop a stippled appearance.
- Control:
- Reflective Mulch: Use reflective mulch to deter leafhoppers from the plants.
- Neem Oil: Spray neem oil to repel and kill leafhoppers.
- Row Covers: Use floating row covers to protect young plants from leafhoppers.
-
Thrips
- Identification: Tiny, slender insects that can be yellow, brown, or black. They often feed within the flowers and young leaves.
- Damage: Thrips scrape plant tissues, causing leaves to develop silvery streaks and flowers to become distorted.
- Control:
- Blue Sticky Traps: Place blue sticky traps near the plants to capture adult thrips.
- Neem Oil: Spray neem oil or insecticidal soap to control thrips populations.
- Predatory Insects: Introduce beneficial insects like predatory thrips or minute pirate bugs that feed on thrips.
-
Root-Knot Nematodes
- Identification: Microscopic roundworms that live in the soil and infect plant roots.
- Damage: Root-knot nematodes cause galls or swellings on the roots, leading to stunted growth, yellowing, and wilting.
- Control:
- Crop Rotation: Rotate sesame with non-host crops to reduce nematode populations.
- Solarization: Use soil solarization to kill nematodes before planting.
- Resistant Varieties: Plant sesame varieties that are resistant to root-knot nematodes.
-
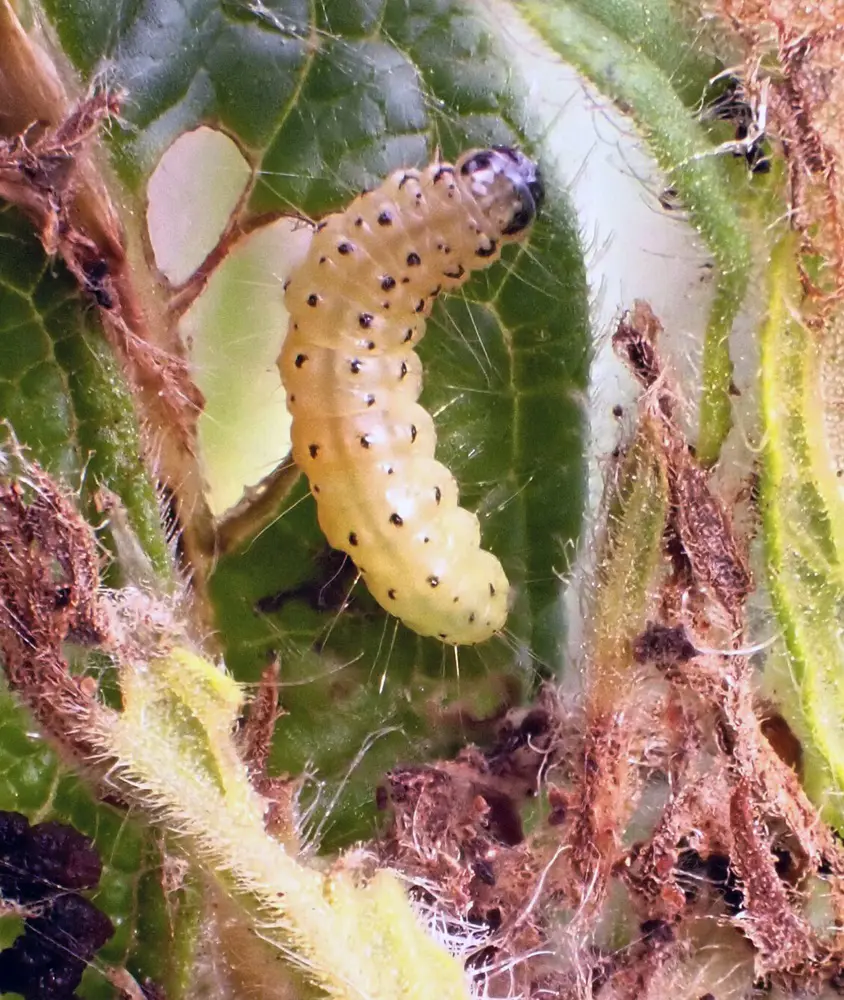
Armyworms
- Identification: Caterpillars that are green, brown, or black with stripes. They are active at night and hide during the day.
- Damage: Armyworms chew on leaves, stems, and pods, causing significant defoliation and crop loss.
- Control:
- Bacillus thuringiensis (Bt): Apply Bt, a biological insecticide, to target armyworms.
- Handpicking: Manually remove and destroy armyworms found on plants.
- Beneficial Birds: Encourage birds that feed on caterpillars by installing birdhouses or feeders nearby.
Bloom And Seeds
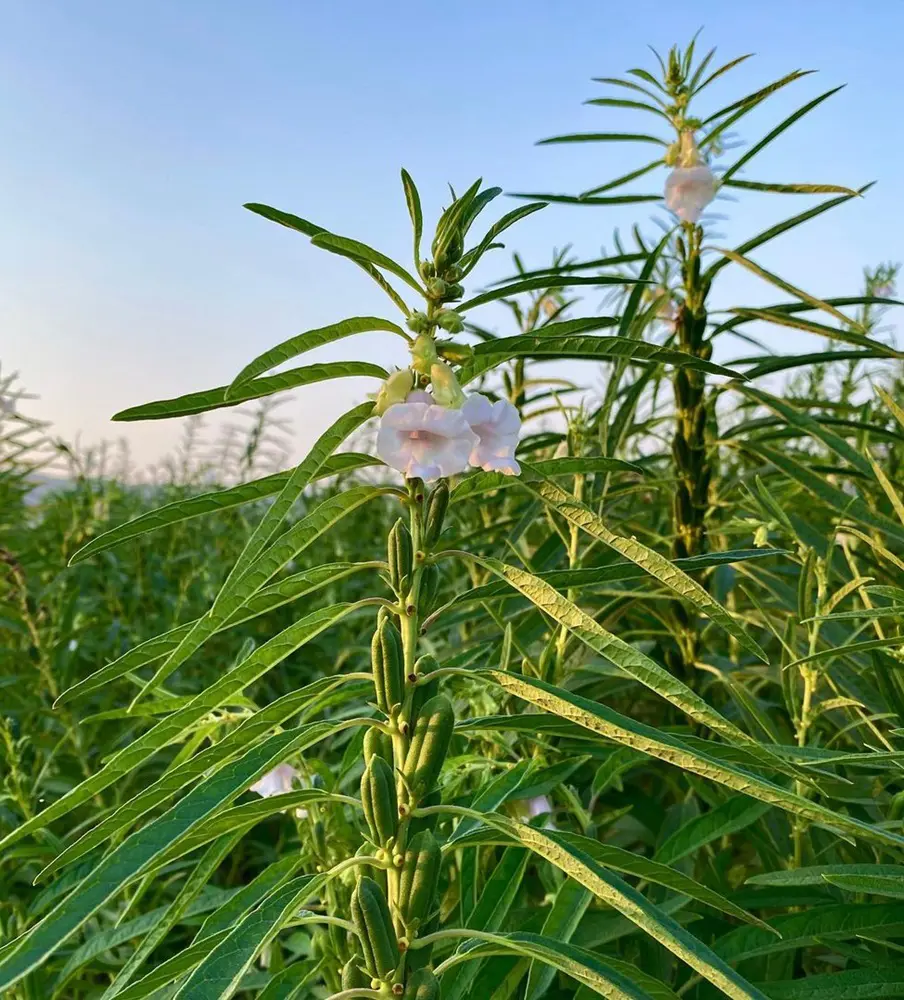
Sesame plants produce beautiful, tubular flowers that can be white, pink, or purple, depending on the variety. The flower later make seeds which is used as a culinary delight.
- Flowering Time: Sesame typically blooms 4-6 weeks after planting. The flowers are usually self-pollinating but can also be cross-pollinated by insects.
- Pollination: While sesame flowers are capable of self-pollination, having a variety of pollinators like bees can improve seed set and yield.
- Flower Duration: Each flower lasts only a day or two, but the plant continues to produce new flowers over several weeks.
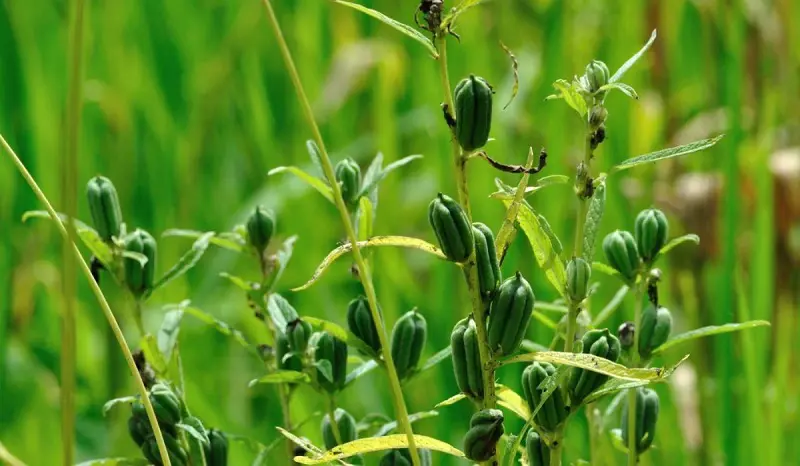
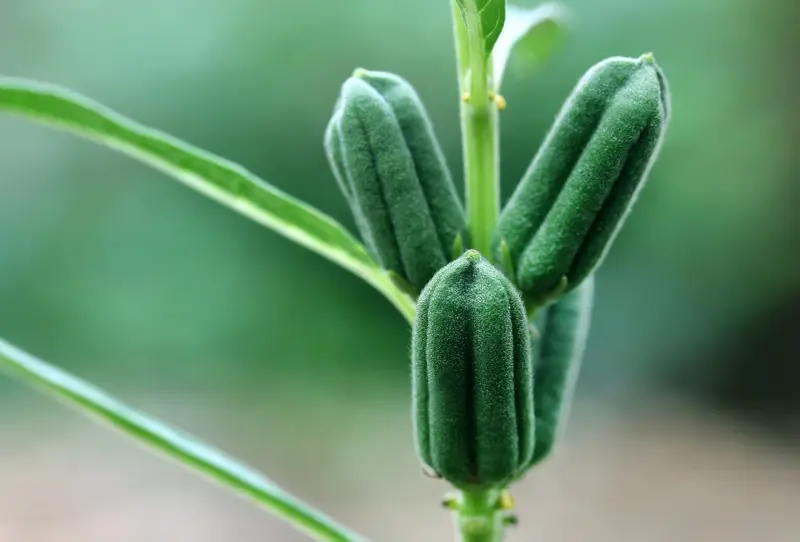
- Seed Formation: After pollination, the flowers wilt and give way to seed pods. These pods mature over 30-40 days, turning brown and splitting open when the seeds are ready for harvest.
Common Issues
Despite being a hardy crop, sesame plants can face several issues during their growth cycle.
- Poor Germination: This can be due to low soil temperatures, poor seed quality, or overly wet soil. Ensure optimal conditions for germination and use fresh seeds.
- Leaf Spot: Fungal infections can cause brown or black spots on leaves. Improve air circulation, avoid overhead watering, and apply fungicides if necessary.
- Stem Rot: Excessive moisture can lead to fungal stem rot. Ensure proper drainage and avoid overwatering.
- Nutrient Deficiency: Yellowing leaves can indicate a lack of nitrogen, while purpling may suggest phosphorus deficiency. Adjust fertilization practices accordingly.
- Low Seed Yield: This can result from inadequate pollination, poor soil fertility, or environmental stress. Ensure plants receive optimal care throughout the growing season.
FAQs
Can sesame be grown indoors?
While sesame plants prefer outdoor conditions with plenty of sunlight, they can be started indoors and then transplanted outside once they are strong enough and the weather is warm.
How long does it take for sesame to mature?
Sesame plants typically take 90-120 days from planting to maturity, depending on the variety and growing conditions.
Can I grow sesame from store-bought seeds?
It is possible to grow sesame from store-bought seeds, but it's best to use seeds specifically meant for planting to ensure good germination and plant health.
How do I know when sesame seeds are ready to harvest?
Sesame seeds are ready to harvest when the pods turn brown and start to split open. The leaves will also turn yellow and begin to fall off.
Is sesame drought-tolerant?
Yes, sesame is drought-tolerant once established, but it requires consistent moisture during germination and early growth stages.
Can sesame be grown in cooler climates?
Sesame prefers warm climates but can be grown in cooler regions with a sufficiently long frost-free period and warm summers.
How can I prevent pests on my sesame plants?
Regular monitoring, introducing beneficial insects, using physical barriers, and applying organic insecticides can help manage pests.
Do sesame plants need to be supported with stakes?
Sesame plants typically have strong stems and do not require staking, but support may be needed in very windy conditions or if the plants become top-heavy.