Whether it's trying to justify the cost of buying a non-contact voltage tester and wire strippers a year ago or you just want to save some money by becoming a handyman and changing the switch for light wiring yourself and are googling "how to wire lights and switch" then you're in the right place.
Changing a standard single-pole lights switch wiring where you flip the switch's toggle up or down is so simplistic that even homeowners with limited DIY experience like you can do it. And the best part is it will only cost you about $5 and 20 minutes of your time.
Identify Your Switch Type
Before you can get started on switch connection for lights, it's necessary for you to identify the switch type that you are currently going to be working on by its wiring configuration before you can learn how to wire a switch for your safety.
This is of importance as depending on the wiring, you may be unable to make use a of single-pole light switch, and trying to proceed with the electric wiring light switch can be hazardous as well.
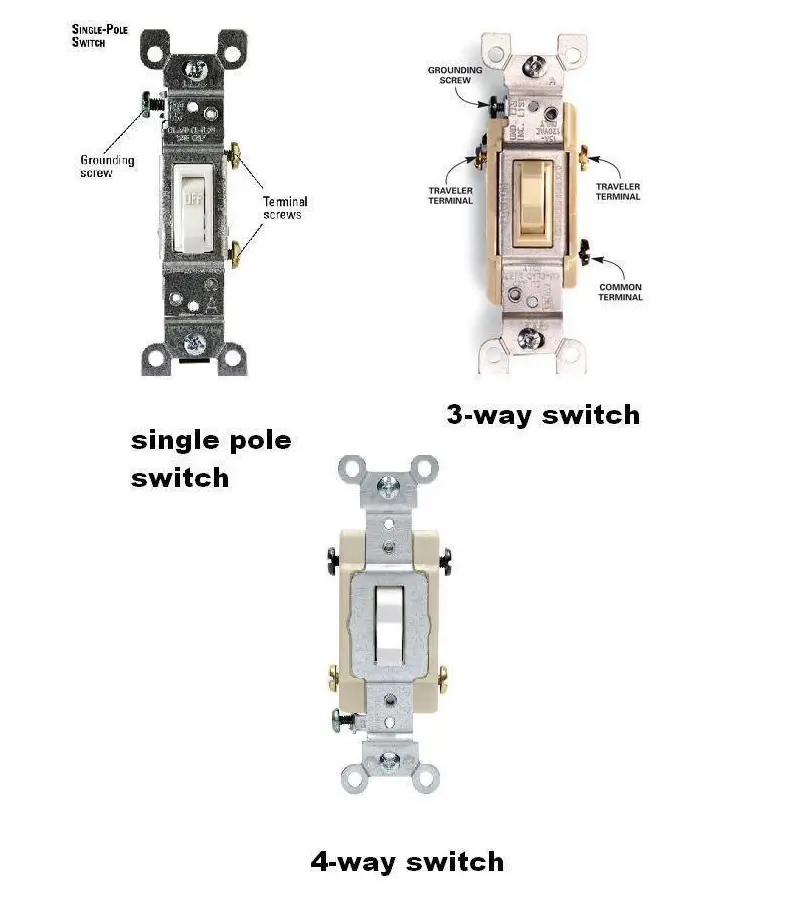
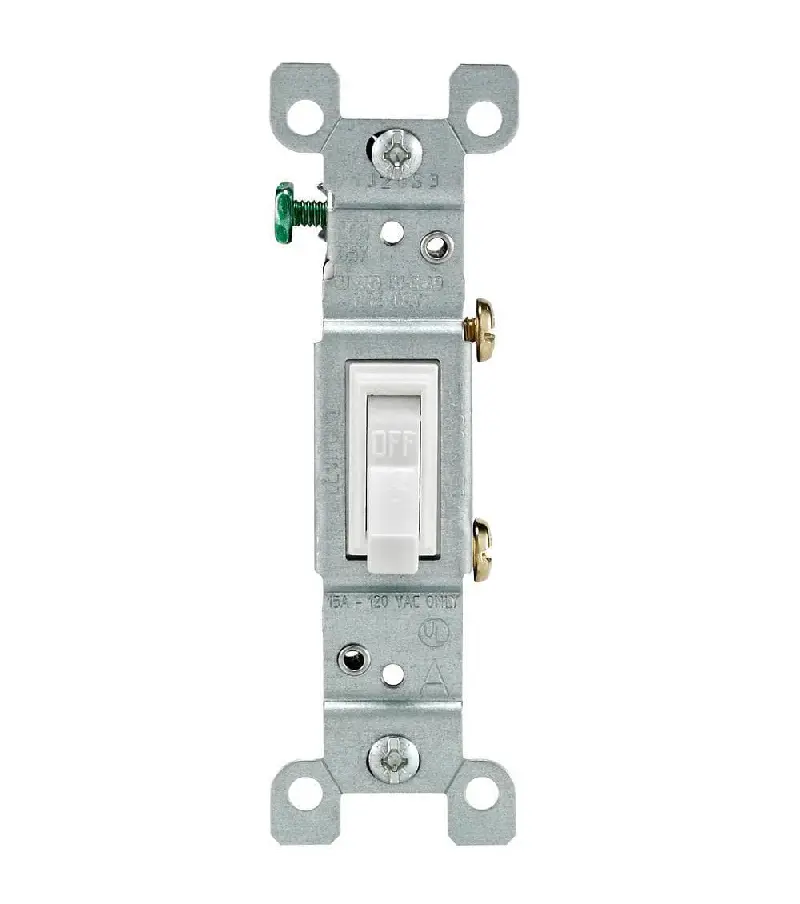
This is the most common type of switch found in homes and it is used to control one device such as a light fixture, electric outlet, or garbage disposal system. On the side, you can see two screw terminals excluding the green grounding screw terminal.
Do keep in mind that the older American homes may be out of regulation and might not have the third green/grounding terminal.
Three-Way Switch
This switch is used where two switches are used to control a single device such as controlling ceiling light from two different locations. Three-way switches have three brass screw terminals excluding the green grounding screw.
One of the brass screws also known as the common brings electricity from the source and is darker than the other brass screws known as travelers.
Four-Way Switch
A four-way switch is used when you require three or more different switches to control the same device. These switches are often used in conjunction with three-way switches. They have four brass screw terminals in addition to the green grounding screw.
Four-way switches are not common in most homes so you shouldn't need to necessarily worry about it.
Wiring And Installing A Switch: Step-By-Step Instructions
Now that you have checked through the switch type and hopefully found a single-pole switch type, we can finally get started on how to wire switch and light. Here are all the tools and materials that you will require which can be brought in as demanded:
Aside from these materials and equipment, you should also consider these safety tips before and while working on the wiring system throughout the entire process in your mind for your safety:
Safety Considerations
All electrical repairs come with some risk of shock so make sure to wear your personal protective equipment (PPE) such as rubber gloves and insulated boots. Make sure to thoroughly test whether a circuit breaker might be malfunctioning as there might still be power in the circuit despite shutting off the power with the breaker box.
Always be careful about relying on the wire labels or the circuit index as they may be incorrect due to negligence on the part of the previous installer. You should never be touching any wires even those labeled as grounding wires and ideally if possible, fix the color code and the label of the wires.
If any white wire is being used as a hot wire, it should be labeled clearly with a tab of red or black electrical tape.
Before you can start working on the light wire switch, you first need to flip the switch of the Minature Circuit Breaker (MCB) which is found in the breaker box to cut off the power to the light switch fixture.
If your house is old enough then your panels may have fuses instead of breakers in the electrical service panel so in that case you need to unscrew the appropriate fuse and remove them to break the power supply. Ah, the inconvenience of old tech.
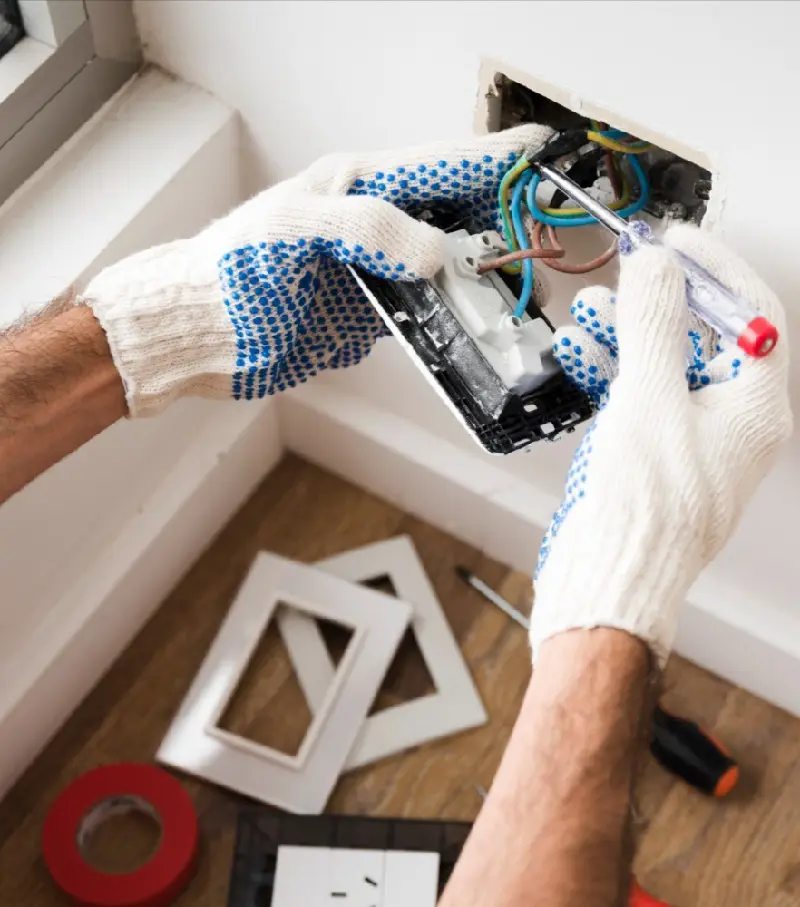
Now that we have broken the supply of power by using the breaker box, we can finally get started on working on the light wire switch. Grab your trusty screwdriver and remove the two screws on the switch cover plate.
Make sure to handle the screws carefully so as to not lose or misplace them, place them in a location with a good contrasting color and far away from the reach of any children if you need to take a break. After removing the screws, remove the delicate switch cover plate gently so as to not break it.
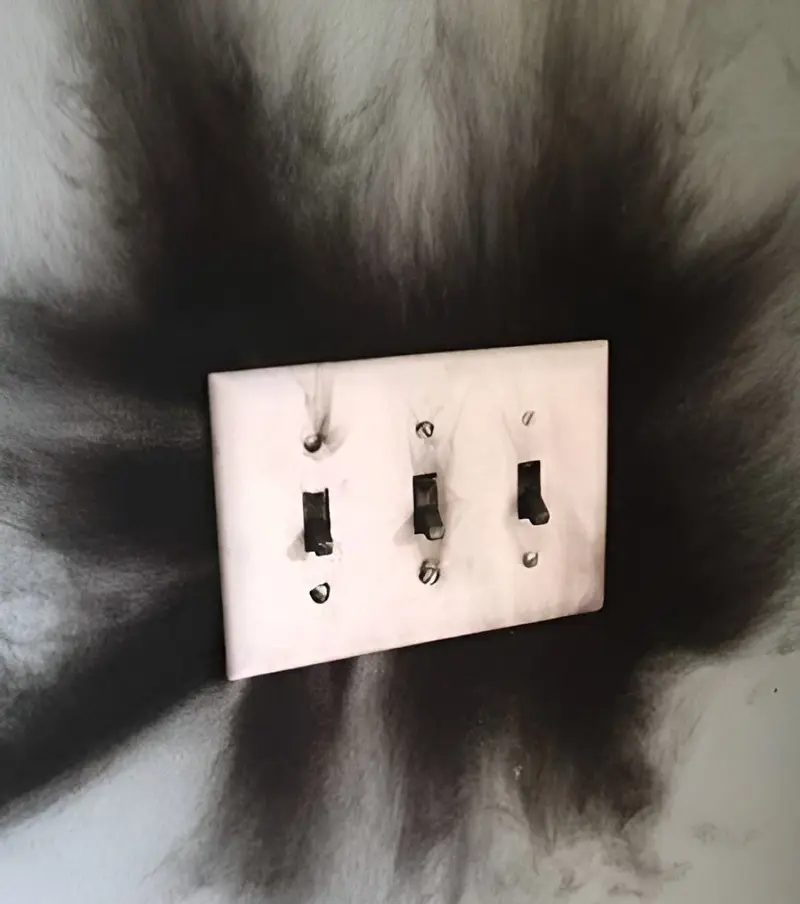
Despite having broken the power supply either due to a breaker malfunction or a fault in the light wiring switch there may still be a supply of electricity either due to coming directly from the power source or due to lack of a return pathway to dissipate the electricity despite cutting off the power.
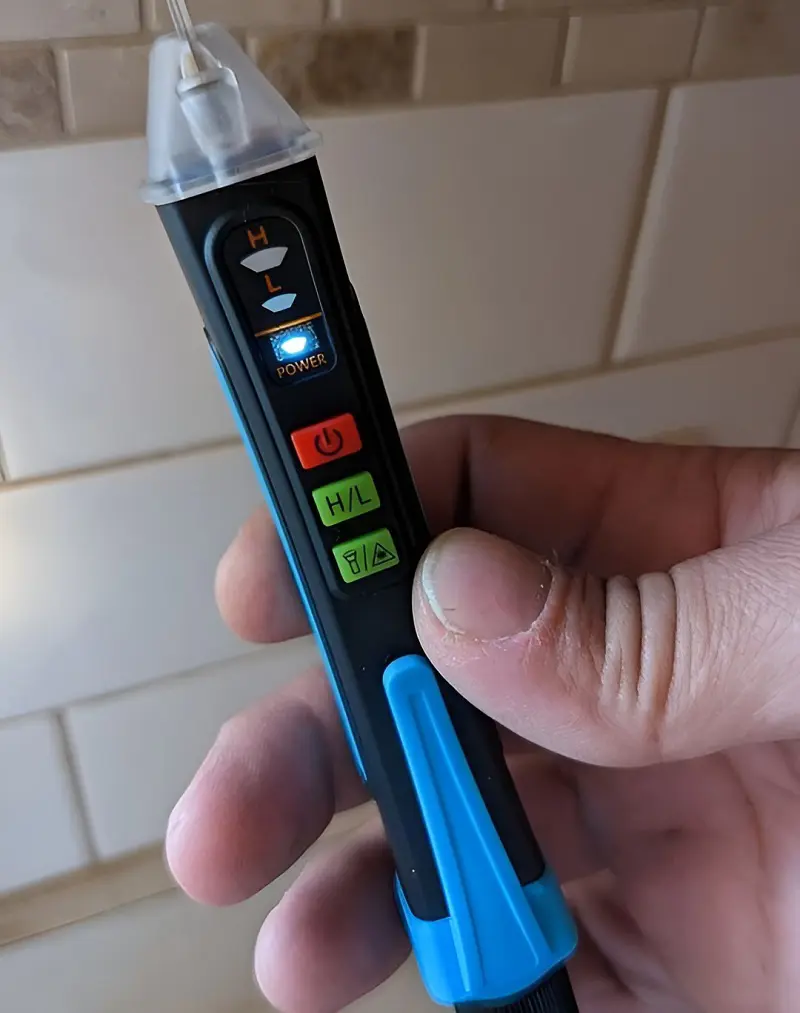
To prevent being shocked, always confirm the lack of power with a non-contact voltage tester by testing all of the wires in the switch box. Also test all three terminals of the switch, brass, and green with the tester probe. If the tester lights up at any time, go back and check if there are any faults in the service panel.
Now that you have successfully confirmed that the light switch on wire is no longer 'on the wire', remove the two screws holding the switch in the box and place them in a good location. If the cover and the switch screws are of different sizes, you may want to place these screws in a box to prevent mix-up.
Carefully pull the switch from the box and check once again if there is any power residing in or being fed to the circuit just to be safe. Once you ensure the power is off once and for all, you can now get started with the removal process of the wires.
Step-5: Disconnect Wiring
Using your screwdriver, loosen each screw terminal and carefully remove the circuit wire to not mess up the existing exposed wire's "u-shape" or a knot. Alternatively, your switch may be connected by a push-in wire connector instead of a screw on the back of your switch.
If this is the case then you can disconnect the wires by pushing a small nail or screwdriver into the release slot next to the push-in connection. If the switch is connected via push-in wire connectors on the back of the switch, you can release the wires by pushing a small nail or screwdriver into the release slot next to the push-in connection.
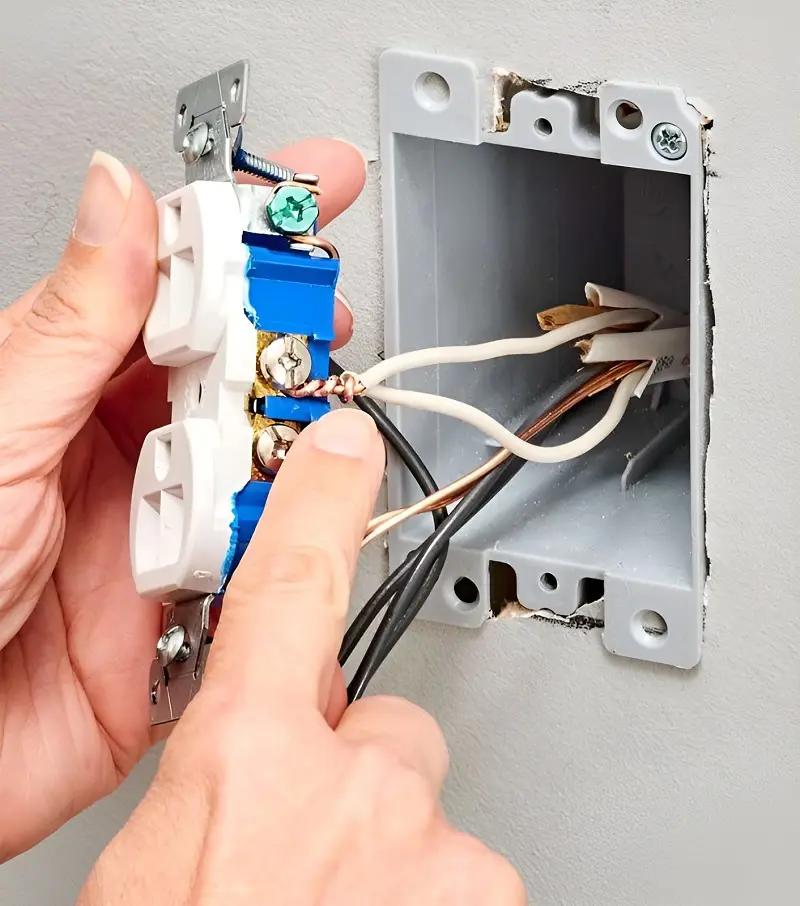
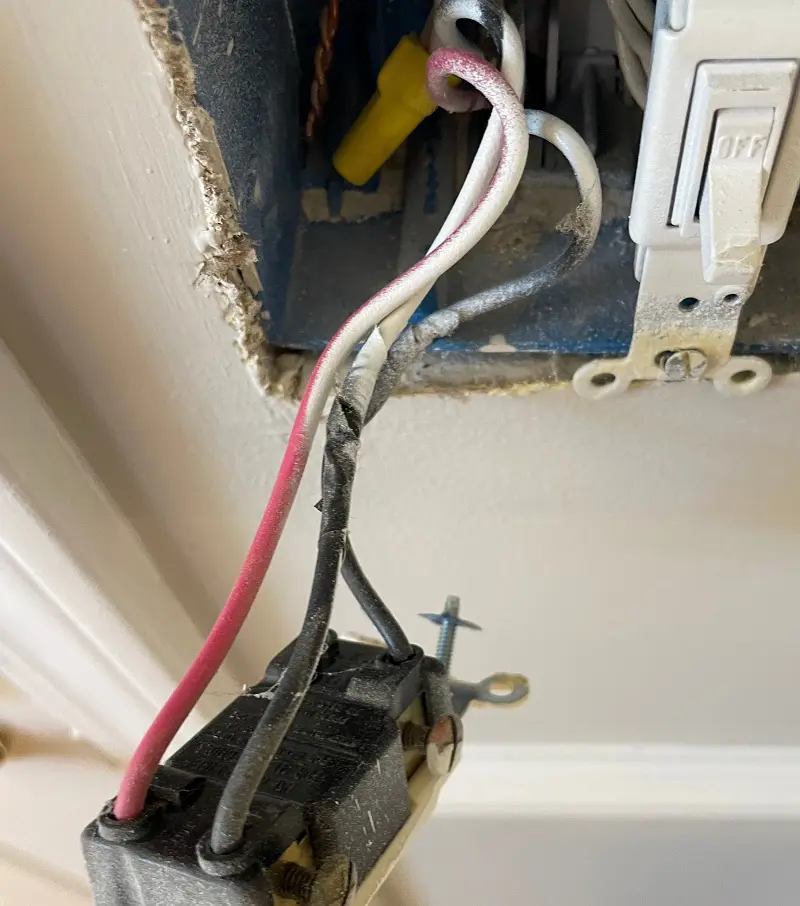
Despite the switch requiring only 3 (or 2 if you're missing ground) wires, there may be more than 3 separate wires present in the box. They can easily be classified into one of the below three categories:
Connecting Live Wires: These are the wires that are connected to the screw terminals of your switch. There should be one exposed wire touching under each screw terminal otherwise your switch box could become a fire hazard which should be amended. The wires may be black, red, or white.
Pass-Through Wires: If there are other wires in the box (typically white) that are not connected to the switch then they are neutral/return circuit wires that merely pass through the box without doing anything else. These wires should be left alone or you may damage the wiring in some other part of your house.
Grounding Wires: This wire is typically connected to the green screw terminal of the switch and is used to ground the switch to facilitate a safer less damaging return part to the earth and prevent damage to the power supply or other parts of your house's electrical wiring. They are typically green or fully exposed copper wires.
Now that the old switch is free of any wires, remove it from the scene and bring in the new switch. We recommend that you install a traditional screw terminal connector switch instead of a push-fit connection switch as it is less reliable than the traditional screw.
How Do You Wire In A Light Switch?
Grounding Terminal: First, connect the green grounding screw to the circuit's bare copper or green grounding wires. There is a possibility that your circuit box may have two grounding wires in which case you need to attach a grounding pigtail to the switch's grounding screw terminal and then join the pigtail to the grounding wires with a wire connector. This type of grounding is typical in metal switch boxes.
Brass Terminals: Inspect the ends of each of your hot wires. They should have about 1/2 to 3/4 inch of bare wires at the end and should form into a hook-like loop. Make sure to wrap those wires around the screws in a clockwise direction as it will tighten them as the screws go down.
After installing all the wires, tug on all the connections to make sure they are tight and won't slip out. In case the end of the wires were in a poor condition or your previous connection was a push-in type, you will need to prepare the wires first before they can be screwed. Here's how to do so:
Preparing Wires For Screwing
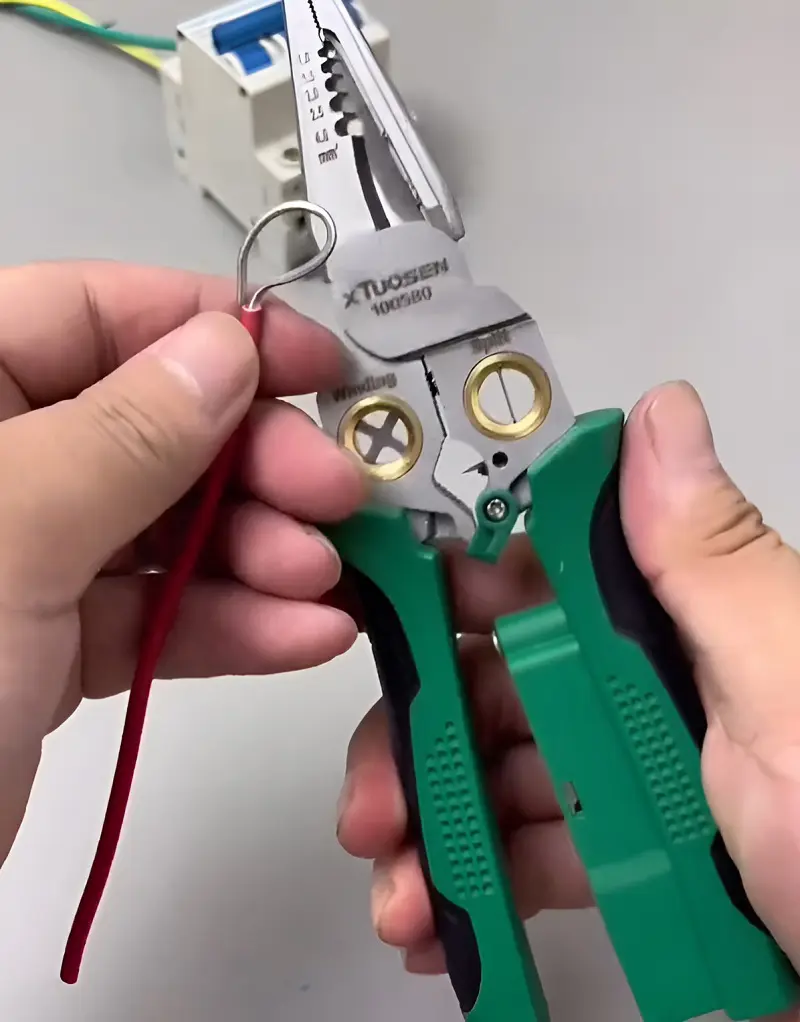
If the previous screwed wire end is in poor condition, trim off the bare end to prevent electric discharge from frayed copper. Then using a wire stripper, strip off about 3/4 inch of the insulation and bend the ends of the wire into a U-shaped loop.
An electrician's pliers have a small hole near the edge that allows you to create a perfect U-loop. Insert the wire into the hole and bend it around the lip of the pilers and now your wires are ready to be screwed into the terminal.
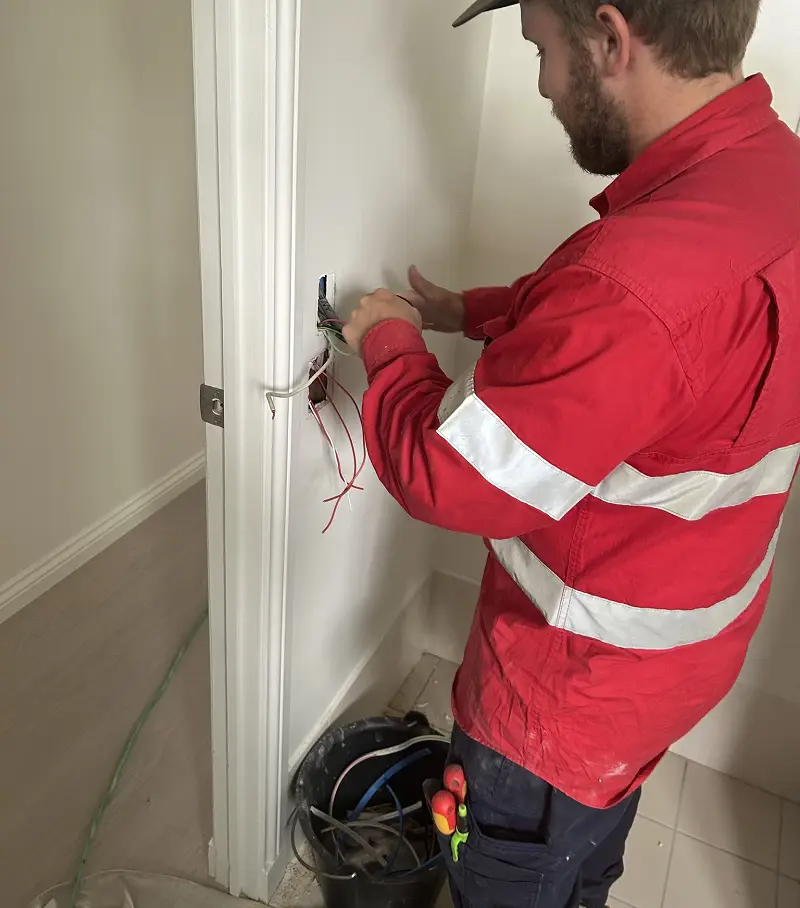
Now that you have learned and finished how to wire a light switch, it's time to mount the switch back onto the box. First to make space gently tuck the wires into the electrical box then align the back plate of the switch to the mounting holes.
Make sure your switch is relatively level and then mount the switch to the box with the two new mounting screws which should have been provided with the switch. Take care not to damage any wiring with the mounting screws.
After mounting the switch box, now we need to mount the switch cover plate as well. Most cover plates require you to mount the cover by using screws just as before so make sure that the mounting holes are level before screwing the cover plate to the box.
Make sure to not overtighten the switch plate as you may crack it. Some newer cover plate designs may be screwless in which case you can simply mount the cover plate by aligning it with the switch and applying pressure to the cover to lock it in place via a plastic latch.
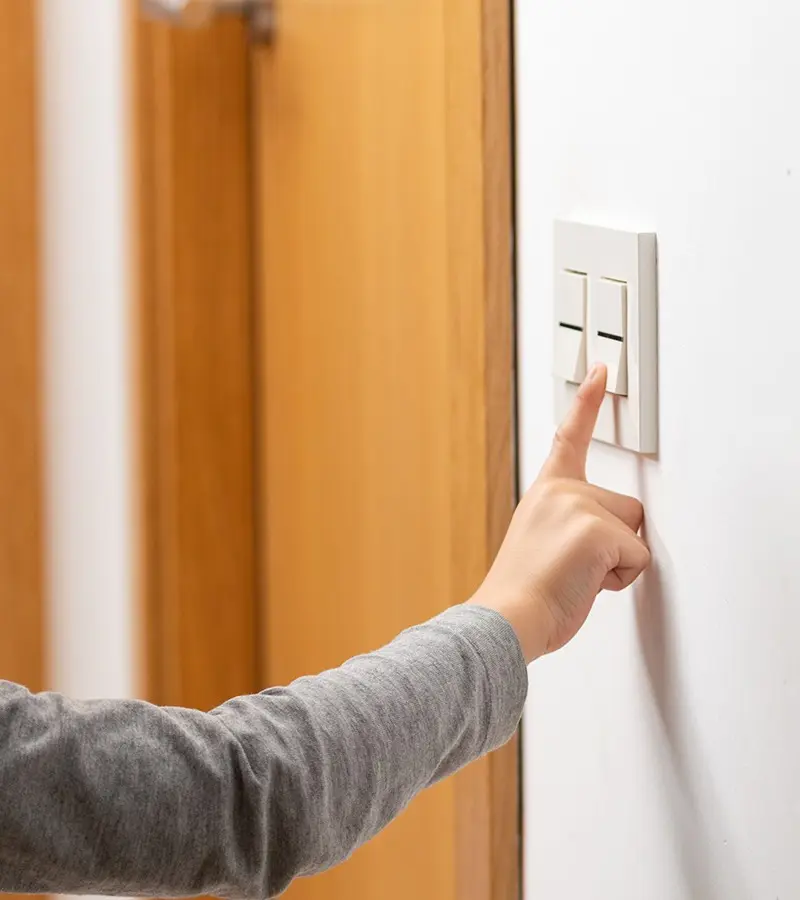
Now that you have completely assembled the switch box, go back to the breaker box and flip on the breaker to resume the regular flow of electricity. Then return to the switch and it on to see if the installation was a success.
If the light doesn't turn on, don't panic, first try the simplest solutions such as making sure the bulb is good and making sure that the breaker hasn't tripped or is malfunctioning by pressing the test button on the breaker.
Tighten The Wires
If none of those measures help then it's also possible that wire connections inside the switch terminals are loose and not making proper contact with the switch. In this case, you will need to shut off the breaker and retighten the wire connections after opening up the switch box.
Switches not being installed properly the first time or the wires coming loose suck but it is what it is.
What Is A Single-Pole Light Switch?
The term single-pole light switch might be confusing for you if you aren't electrically inclined or electric-savvy. A single-pole switch is often used in the electric world by hardware dealers and electricians to refer to a simple ON-OFF type toggle switch which generally controls only one light fixture.
When you turn on the switch and complete the circuit, the electricity flowing from the source and the inbound/hot wire will be able to travel through the pole/switch to the outbound/neutral wire and power up the light fixture. When the switch is off, you interrupt this flow of electricity and turn off the lights.
If you look closely at the switch, you can see three terminals for the wires to connect. Two of them are brass terminal screws on the sides which will either have two black/red wires that indicate live/hot wires or one black/red and one white wire which indicates a neutral/return wire.
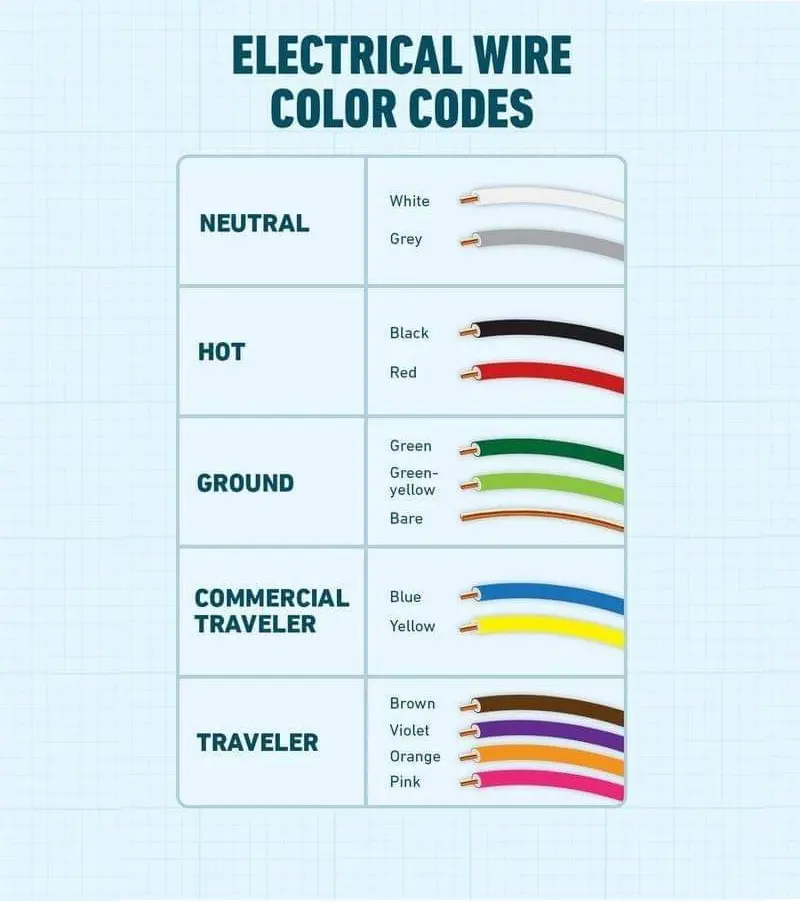
However, you should always try to avoid touching all the wires for utmost safety as the installer may have wired with the wrong colors or sometimes the grounding of the switch may have failed. Regardless, this is what they signify according to the American Electrical Standards & Codes:
Black/Red Wire
These wires are connected directly to the electrical panel (power source) so they will always be live and dangerous to touch. If you have two black/red wires or alternatively a white wire with black/red tape then it indicates that the switch is not the last fixture on the circuit.
Hence, the second black wire goes to one more light fixture aside from the one it is currently connected to. This means this wire is equally dangerous to touch when the circuit is running as it is not close to the ground.
White Wire
When your switch terminal has a white wire, it is the return/neutral wire that takes the electricity back to the source i.e. the electrical panel. For safety reasons, to prevent an excessive potential difference between the source and the returning wire they are often connected to the ground potential.
High potential difference can cause an electric discharge so this grounding of neutral wire means that on the off-chance that you happen to touch it while the circuit is complete, it should be safer than a life wire
Green/Copper Wire
Aside from the two brass screw terminals, there is also a green grounding screw terminal at the back which connects to the circuit's bare copper/green ground wire for safe grounding in case of a short circuit to prevent an electric arc discharge.
This wire is also safe to touch as opposed to a live wire unless there is an electric surge discharge (short-circuit) actively running through it which will cause the electricity to flow to the ground through the grounding wire instead of the return wire.
Where To Install Different Wires On A Light Switch?
In a single-pole switch connected to a single light fixture, you don't need to worry about where you install the black and the white wires because they are interchangeable and it doesn't matter which wire you put on the different sides of the light switch terminal.
You should be fine as long as you do not mix up the wires of the brass live wire terminals with the green copper ground terminal. If you have two black wires, it is best to take a picture beforehand to see which wire went into a certain hole and reassemble it in its previous configuration.
What Happens If You Wire A Light Switch Incorrectly?
If you wire a light switch incorrectly, in the best-case scenario the light may turn on dimly or otherwise not turn on at all. However, in the worst case especially if you managed to mix up the grounds and the live wire, you could see an electric discharge or an overload.
Thankfully there are many safety measures in place in modern homes such as the circuit breakers to flip off and protect the rest of the wiring or the wires in the box arcing towards the ground which may or may not create sparks.
How Can You Tell Which Wires Are Hot Or Neutral?
It's not always possible to tell which wires are hot or neutral simply by relying on the wire color code (white is neutral, black/red is hot) as there is a possibility of them being installed correctly due to negligence or laziness on the part of the previous installer.
However, if you really want to be sure then without switching off the breaker and while the circuit is incomplete, test the voltage readings by using a multimeter on each of the brass terminal wires. The wire that shows no voltage reading is the neutral wire while the one that does is the hot wire.
There's a slight possibility that your switch may not be of the one-pole switch category after checking its wiring configuration to ensure that it was the one-pole switch. In such a case this guide isn't completely appropriate for you due to the inherent design differences in the switches.
The wiring guides on the three-way switch and on four-way switch can differ from what we have talked about here, so it is better to take a professional's advice.