Squash, with its diverse range of varieties, colors, and flavors, offers a delightful addition to any culinary repertoire. From the delicate zucchini of summer to the hearty butternut squash of winter, these vegetables bring richness and nutrition to countless dishes.
However, to enjoy their goodness year-round, mastering the art of proper storage is essential. In this comprehensive guide, we'll explore the nuances of storing both summer and winter squash varieties, ensuring their freshness and flavor endure long after harvest.
How To Store Summer Squash?
Summer squash is a versatile and delicious vegetable that can be enjoyed in numerous ways. Whether you're a seasoned gardener with a bumper crop or a market shopper looking to make the most of seasonal produce, knowing how to properly store summer squash is essential to prolong its freshness and ensure you can enjoy it at its best.
This comprehensive guide will cover everything you need to know about storing summer squash, including types of summer squash, harvesting tips, short-term and long-term storage methods, and creative preservation techniques.
Types of Summer Squash
Before diving into storage techniques, it's important to understand the different types of summer squash. Common varieties include:
- Zucchini: Probably the most well-known summer squash, zucchini is long and cylindrical with dark green skin.
- Yellow Squash: This variety includes both straightneck and crookneck types, characterized by their vibrant yellow color.
- Pattypan Squash: Also known as scallop squash, this type is small, round, and flat with scalloped edges.
- Cousa Squash: A Middle Eastern variety, cousa is shorter and thicker than zucchini, with a light green skin.
Each type of summer squash has slightly different characteristics, but they all share a tender texture and mild flavor that makes them ideal for a wide range of culinary applications.
Harvesting Tips
Proper harvesting is the first step in ensuring that your summer squash stays fresh for as long as possible. Here are some tips to keep in mind:
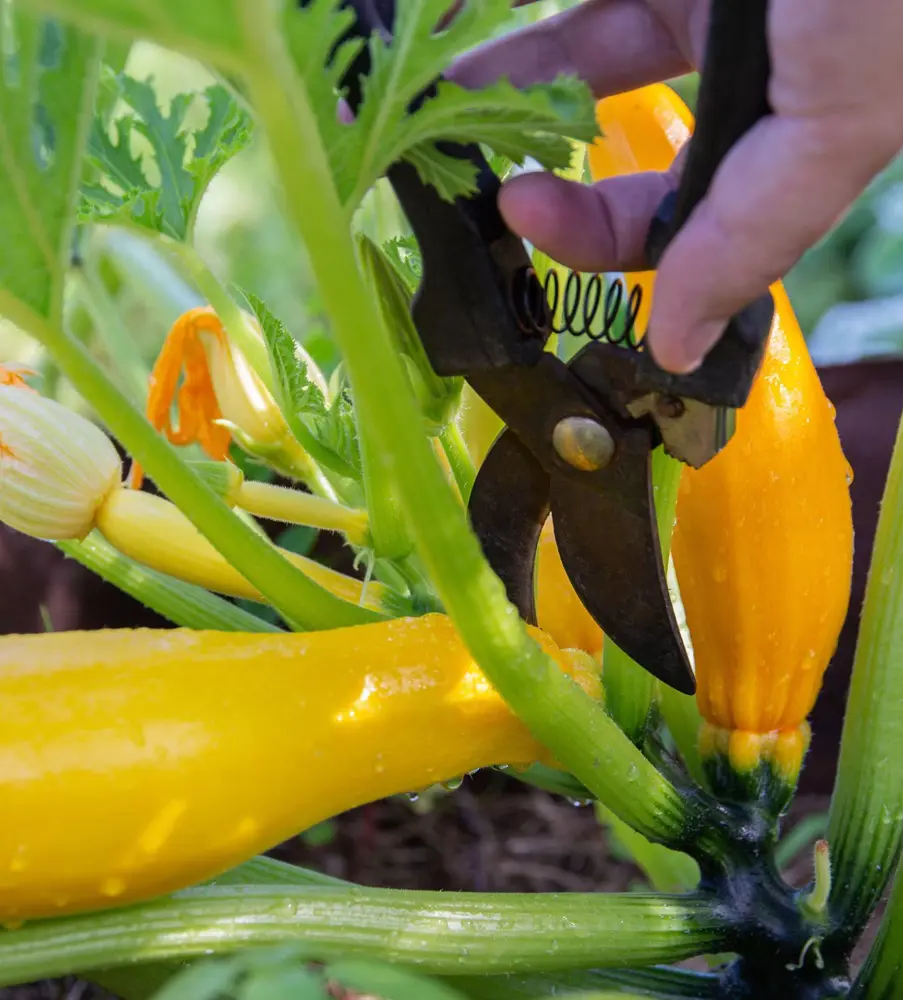
- Timing: Harvest summer squash when they are young and tender. For zucchini and yellow squash, this is typically when they are 6-8 inches long. Pattypan squash should be about 2-4 inches in diameter.
- Tools: Use a sharp knife or garden shears to cut the squash from the vine. This minimizes damage to both the fruit and the plant.
- Handling: Handle squash gently to avoid bruising or damaging the skin, which can lead to quicker spoilage.
Short-Term Storage
For short-term storage, summer squash can be kept fresh for up to a week with the right techniques. Here’s how:
- Refrigeration: Store summer squash in the crisper drawer of your refrigerator. Place them in a perforated plastic bag or wrap them loosely in a paper towel to maintain humidity while allowing some air circulation. Avoid sealing them in airtight containers, as this can trap moisture and accelerate decay.
- Temperature: Keep the refrigerator temperature between 40-45°F (4-7°C). Temperatures lower than this can cause chilling injuries, leading to pitting and loss of flavor.
- Checking: Regularly check the squash for signs of spoilage, such as soft spots, mold, or an odor. Remove any damaged squash to prevent it from affecting the others.
Long-Term Storage
If you have a large harvest and need to store summer squash for longer periods, consider these methods:
-
Freezing: Freezing is an effective way to preserve summer squash for several months.
- Blanching: Begin by washing and cutting the squash into slices or cubes. Blanch the pieces in boiling water for 2-3 minutes, then immediately transfer them to an ice bath to stop the cooking process.
- Drying: Pat the blanched squash dry with a towel to remove excess moisture.
- Packing: Place the dried pieces in a single layer on a baking sheet and freeze until solid. Once frozen, transfer them to airtight freezer bags or containers, removing as much air as possible to prevent freezer burn. Label and date the bags.
- Storage: Store the bags in the freezer at 0°F (-18°C) or lower. Frozen squash can be kept for up to a year.
-
Canning: While summer squash is not typically recommended for canning due to its low acidity, it can be safely preserved using a pressure canner.
- Preparation: Wash and slice the squash. Pack the slices into sterilized jars, leaving about an inch of headspace.
- Processing: Fill the jars with boiling water, broth, or a light brine solution, ensuring the squash is completely covered. Seal the jars with lids and process them in a pressure canner according to the manufacturer's instructions for your altitude and jar size.
- Storage: Store the sealed jars in a cool, dark place. Properly canned squash can last for up to a year.
-
Drying: Dehydrating summer squash can extend its shelf life significantly.
- Preparation: Wash and slice the squash into uniform pieces. Blanching is optional but can help retain color and texture.
- Dehydrating: Arrange the slices on dehydrator trays in a single layer, ensuring they don’t overlap. Set the dehydrator to 125°F (52°C) and dry for 6-12 hours, or until the pieces are brittle and no longer pliable.
- Storage: Store the dried squash in airtight containers or vacuum-sealed bags in a cool, dark place. Properly dried squash can last for several months to a year.
Creative Preservation Techniques
Beyond traditional storage methods, there are several creative ways to preserve summer squash:
-
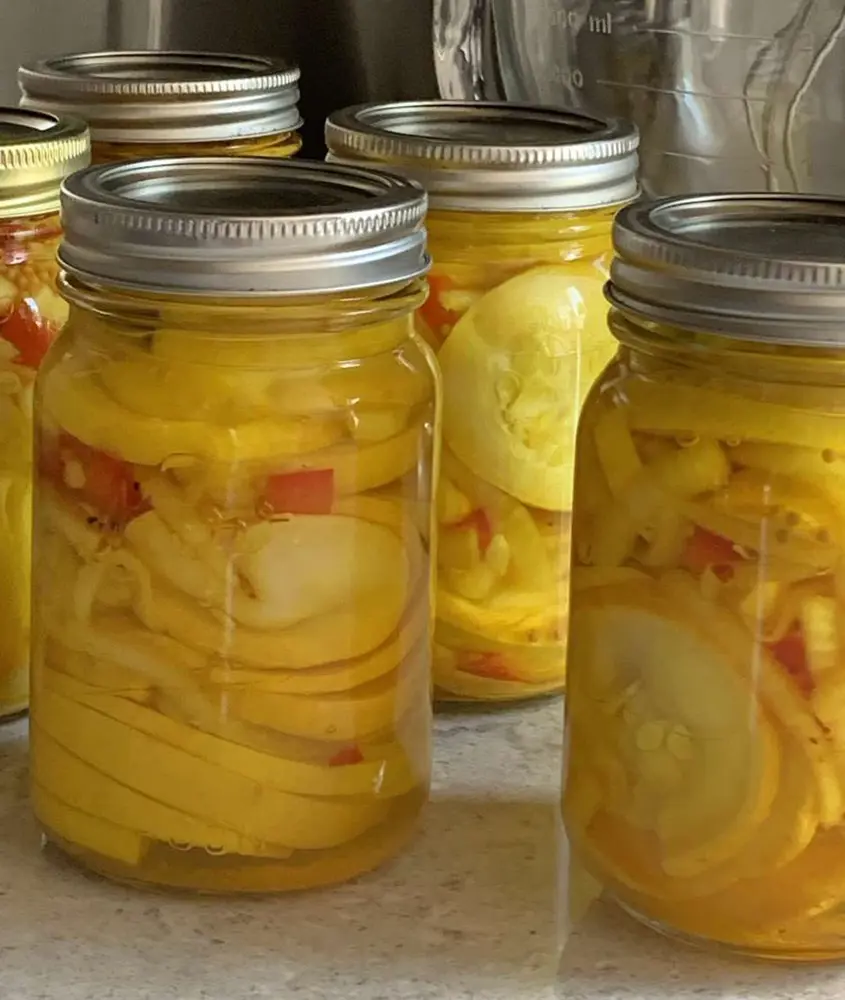
Pickling: Pickling not only preserves summer squash but also adds a tangy flavor that can be a delightful addition to salads, sandwiches, and charcuterie boards.
- Preparation: Wash and slice the squash into thin rounds or spears. You can also include other vegetables, such as onions, carrots, or peppers, for added flavor and texture.
- Brine: Prepare a brine with vinegar, water, salt, and spices like mustard seeds, dill, and garlic. Bring the brine to a boil and pour it over the squash in sterilized jars.
- Processing: Seal the jars and process them in a boiling water bath for 10-15 minutes. Store the pickled squash in a cool, dark place. It will be ready to eat after about two weeks and can be kept for several months.
-
Fermenting: Fermentation is a traditional preservation method that enhances the nutritional value of squash through the development of beneficial probiotics.
- Preparation: Wash and cut the squash into small pieces. Place them in a fermentation vessel, such as a mason jar, along with any desired flavorings like garlic, dill, or chili flakes.
- Brine: Create a brine with water and salt (typically 2-3 tablespoons of salt per quart of water). Pour the brine over the squash, ensuring it is fully submerged. Weigh the squash down with a fermentation weight or a clean, heavy object to keep it under the brine.
- Fermentation: Cover the jar with a cloth or fermentation lid and let it sit at room temperature for 5-10 days. Taste the squash periodically until it reaches your desired level of tanginess.
- Storage: Once fermented, transfer the squash to the refrigerator to slow the fermentation process. Fermented squash can last for several months in the fridge.
-
Making Squash Chips: Transforming summer squash into crispy chips is a delicious way to enjoy this vegetable year-round.
- Preparation: Wash and slice the squash thinly, using a mandoline for uniform slices.
- Seasoning: Toss the slices with olive oil and your favorite seasonings, such as salt, pepper, garlic powder, or paprika.
- Baking: Arrange the slices on a baking sheet lined with parchment paper. Bake at a low temperature (around 225°F or 110°C) for 1.5-2 hours, flipping halfway through, until the chips are crisp and golden.
- Storage: Allow the chips to cool completely before storing them in an airtight container. They can be kept at room temperature for up to a week.
Using Preserved Summer Squash
Having a stash of preserved summer squash opens up a world of culinary possibilities. Here are some ideas for using your stored squash:
-
Frozen Squash:
- Soups and Stews: Add frozen squash directly to soups and stews. It will cook quickly and add a nutritious boost.
- Stir-Fries: Toss frozen squash into stir-fries for a quick and easy vegetable addition.
- Baking: Thaw and drain frozen squash before using it in baked goods like zucchini bread or muffins.
-
Canned Squash:
- Casseroles: Use canned squash in casseroles, mixing it with other vegetables, proteins, and grains.
- Pasta Dishes: Add canned squash to pasta sauces for extra flavor and nutrition.
- Purees: Blend canned squash into a smooth puree to use in soups, dips, or as a base for sauces.
-
Dried Squash:
- Trail Mix: Include dried squash chips in homemade trail mix for a crunchy, healthy snack.
- Rehydration: Rehydrate dried squash by soaking it in hot water for 10-15 minutes before using it in recipes like soups, stews, or casseroles.
- Baking: Grind dried squash into a powder and incorporate it into baked goods for added nutrition and flavor.
-
Pickled Squash:
- Salads: Add pickled squash to salads for a tangy, crunchy element.
- Sandwiches: Use pickled squash in sandwiches and wraps for an extra layer of flavor.
- Appetizers: Serve pickled squash as part of an antipasto platter or charcuterie board.
-
Fermented Squash:
- Condiment: Use fermented squash as a condiment on burgers, hot dogs, or sandwiches.
- Side Dish: Serve fermented squash as a side dish to complement meats and other main courses.
- Probiotic Boost: Add fermented squash to smoothies or bowls for a probiotic-rich boost.
Storing summer squash properly allows you to enjoy this versatile vegetable well beyond its peak season. Whether you're refrigerating for short-term use, freezing, canning, drying, pickling, or fermenting for long-term storage, each method has its own benefits and applications.
By following these guidelines and exploring creative preservation techniques, you can savor the flavors of summer squash throughout the year. Whether you're adding it to soups, stews, casseroles, or enjoying it as a snack, preserved summer squash is a valuable addition to your pantry.
How To Store Winter Squash?
Winter squash is a staple in many kitchens, providing a versatile and nutrient-dense ingredient to enjoy throughout the colder months. Unlike their summer counterparts, winter squash varieties such as butternut, acorn, spaghetti, and Hubbard squash have hard skins that make them well-suited for long-term storage.
This guide will walk you through everything you need to know about storing winter squash, from selecting the best squash for storage to various preservation methods.
Selecting and Harvesting Winter Squash
Before you can store winter squash, it’s crucial to select the right ones. Here are some tips for selecting and harvesting winter squash:
-
Varieties: Popular winter squash varieties include:
- Butternut Squash: Smooth, tan skin with sweet, orange flesh.
- Acorn Squash: Dark green skin with distinctive ridges and sweet, yellow-orange flesh.
- Spaghetti Squash: Pale yellow skin with stringy flesh that resembles spaghetti when cooked.
- Hubbard Squash: Large, often with blue-gray or orange skin and dense, sweet flesh.
-
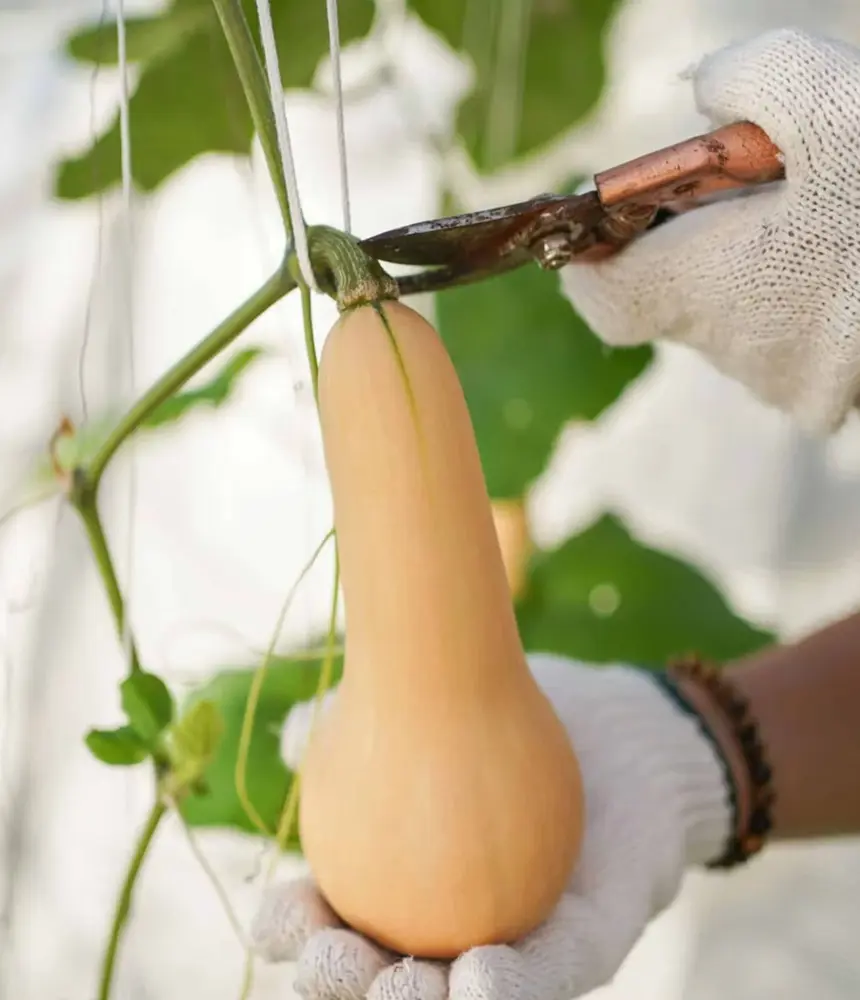
Maturity: Harvest winter squash when they are fully mature. The skin should be hard and difficult to pierce with a fingernail, and the stem should be dry and brown. Immature squash will not store well.
-
Tools: Use a sharp knife or pruning shears to cut the squash from the vine, leaving about 2 inches of stem attached. This helps prevent decay and extends storage life.
-
Curing: After harvesting, cure the squash by placing them in a warm, dry, and well-ventilated area for 10-14 days. This process hardens the skin and heals any minor cuts, improving its storage life.
Short-Term Storage
For short-term storage, winter squash can be kept fresh for several weeks to a few months if stored properly. Follow these steps:
-
Temperature: Store winter squash in a cool, dry place with temperatures between 50-55°F (10-13°C). A basement, root cellar, or unheated closet can work well. Avoid areas that are too warm, as this can shorten the squash’s shelf life.
-
Humidity: Maintain a relative humidity of 50-70%. Too much humidity can promote mold growth, while too little can cause the squash to dry out.
-
Air Circulation: Ensure good air circulation around the squash to prevent moisture buildup and mold. Do not stack the squash directly on top of each other. Instead, place them on shelves, racks, or in single layers in crates or baskets.
-
Checking: Regularly check stored squash for signs of spoilage, such as soft spots, mold, or an off odor. Remove any damaged squash immediately to prevent it from affecting others.
Long-Term Storage
For longer-term storage, winter squash can be preserved using various methods. Here are the best techniques:
-
Freezing: Freezing is an effective way to preserve winter squash for up to a year.
- Preparation: Wash, peel, and cut the squash into cubes. Remove the seeds and stringy pulp.
- Blanching: Blanch the squash cubes in boiling water for 3 minutes, then immediately transfer them to an ice bath to stop the cooking process.
- Drying: Pat the blanched squash dry with a towel to remove excess moisture.
- Packing: Place the dried cubes on a baking sheet in a single layer and freeze until solid. Once frozen, transfer them to airtight freezer bags or containers, removing as much air as possible to prevent freezer burn. Label and date the bags.
- Storage: Store the bags in the freezer at 0°F (-18°C) or lower. Frozen squash can be kept for up to a year.
-
Canning: Canning winter squash requires a pressure canner due to its low acidity.
- Preparation: Wash, peel, and cut the squash into cubes.
- Processing: Pack the cubes into sterilized jars, leaving about 1 inch of headspace. Fill the jars with boiling water or a light syrup, ensuring the squash is fully covered. Seal the jars with lids and process them in a pressure canner according to the manufacturer's instructions for your altitude and jar size.
- Storage: Store the sealed jars in a cool, dark place. Properly canned squash can last for up to a year.
-
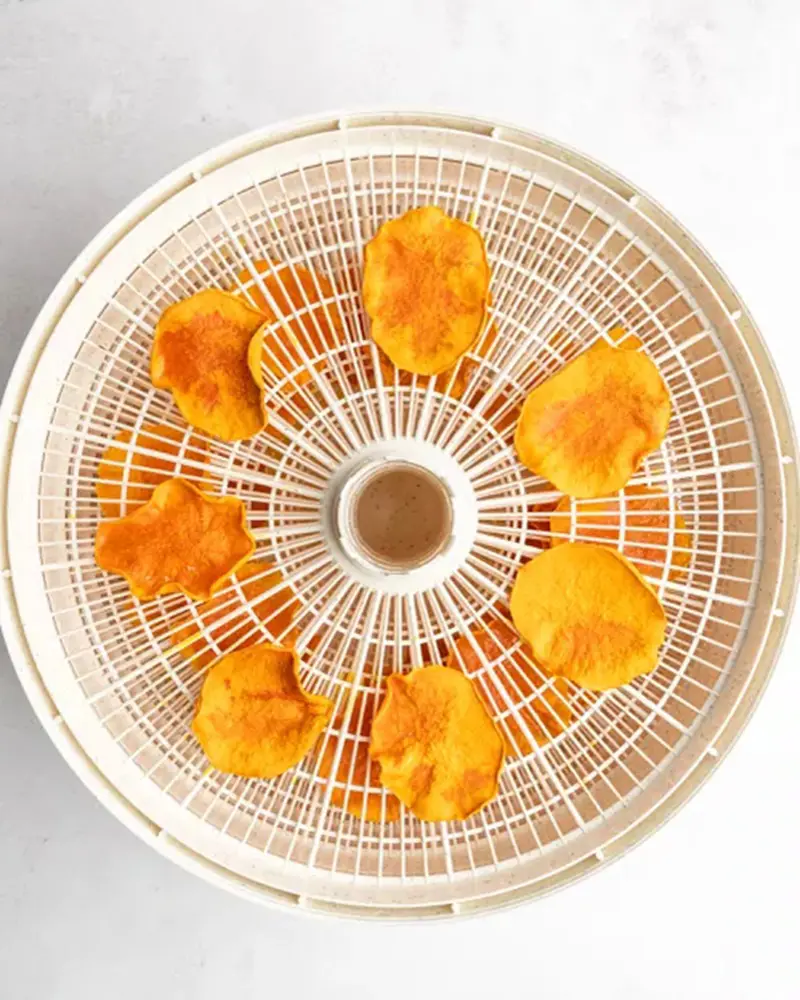
Drying: Dehydrating winter squash can significantly extend its shelf life.
- Preparation: Wash, peel, and cut the squash into uniform slices or cubes.
- Blanching: Optional, but can help retain color and texture. Blanch the slices or cubes in boiling water for 3 minutes, then transfer to an ice bath.
- Dehydrating: Arrange the slices or cubes on dehydrator trays in a single layer. Set the dehydrator to 125°F (52°C) and dry for 10-16 hours, or until the pieces are brittle and no longer pliable.
- Storage: Store the dried squash in airtight containers or vacuum-sealed bags in a cool, dark place. Properly dried squash can last for several months to a year.
-
Pickling: Pickling adds a tangy flavor to winter squash and can be a unique preservation method.
- Preparation: Wash, peel, and cut the squash into thin slices or cubes.
- Brine: Prepare a brine with vinegar, water, salt, and spices like mustard seeds, dill, and garlic. Bring the brine to a boil and pour it over the squash in sterilized jars.
- Processing: Seal the jars and process them in a boiling water bath for 10-15 minutes. Store the pickled squash in a cool, dark place. It will be ready to eat after about two weeks and can be kept for several months.
Creative Preservation Techniques
In addition to traditional methods, there are several creative ways to preserve winter squash:
-
Fermenting: Fermentation enhances the nutritional value of squash and adds a unique flavor.
- Preparation: Wash and cut the squash into small pieces. Place them in a fermentation vessel, such as a mason jar, along with any desired flavorings like garlic, dill, or chili flakes.
- Brine: Create a brine with water and salt (typically 2-3 tablespoons of salt per quart of water). Pour the brine over the squash, ensuring it is fully submerged. Weigh the squash down with a fermentation weight or a clean, heavy object to keep it under the brine.
- Fermentation: Cover the jar with a cloth or fermentation lid and let it sit at room temperature for 5-10 days. Taste the squash periodically until it reaches your desired level of tanginess.
- Storage: Once fermented, transfer the squash to the refrigerator to slow the fermentation process. Fermented squash can last for several months in the fridge.
-
Making Squash Chips: Turn winter squash into crispy chips for a healthy snack.
- Preparation: Wash, peel, and slice the squash thinly, using a mandoline for uniform slices.
- Seasoning: Toss the slices with olive oil and your favorite seasonings, such as salt, pepper, garlic powder, or paprika.
- Baking: Arrange the slices on a baking sheet lined with parchment paper. Bake at a low temperature (around 225°F or 110°C) for 1.5-2 hours, flipping halfway through, until the chips are crisp and golden.
- Storage: Allow the chips to cool completely before storing them in an airtight container. They can be kept at room temperature for up to a week.
Using Preserved Winter Squash
Having a supply of preserved winter squash opens up many culinary possibilities. Here are some ideas for using your stored squash:
-
Frozen Squash:
- Soups and Stews: Add frozen squash directly to soups and stews. It will cook quickly and add a nutritious boost.
- Baking: Thaw and drain frozen squash before using it in baked goods like squash bread or muffins.
- Purees: Thaw frozen squash and blend it into a smooth puree to use in soups, sauces, or as baby food.
-
Canned Squash:
- Casseroles: Use canned squash in casseroles, mixing it with other vegetables, proteins, and grains.
- Pasta Dishes: Add canned squash to pasta sauces for extra flavor and nutrition.
- Purees: Blend canned squash into a smooth puree to use in soups, dips, or as a base for sauces.
-
Dried Squash:
- Trail Mix: Include dried squash chips in homemade trail mix for a crunchy, healthy snack.
- Rehydration: Rehydrate dried squash by soaking it in hot water for 10-15 minutes before using it in recipes like soups, stews, or casseroles.
- Baking: Grind dried squash into a powder and incorporate it into baked goods for added nutrition and flavor.
-
Pickled Squash:
- Salads: Add pickled squash to salads for a tangy, crunchy element.
- Sandwiches: Use pickled squash in sandwiches and wraps for an extra layer of flavor.
- Appetizers: Serve pickled squash as part of an antipasto platter or charcuterie board.
- Fermented Squash:
- Condiment: Use fermented squash as a condiment on burgers, hot dogs, or sandwiches.
- Side Dish: Serve fermented squash as a side dish to complement meats and other main courses.
- Probiotic Boost: Add fermented squash to smoothies or bowls for a probiotic-rich boost.
Learning how to store winter squash properly allows you to enjoy this nutritious and versatile vegetable long after the harvest season has ended. Whether you're storing squash for short-term use or preserving it for the months ahead, there are various methods to suit your needs and preferences.
From traditional storage in a cool, dry place to creative preservation techniques like freezing, canning, drying, pickling, and fermenting, the options are plentiful.
By following the guidelines outlined in this comprehensive guide and exploring different preservation methods, you can ensure a steady supply of winter squash to enjoy in soups, stews, casseroles, baked goods, and more throughout the colder months.